Looking to Create Wallpapers with Blender

Hello everyone, I’m new to the site, this is my first post.

A friend showed me the wallpapers here, and I was immediately surprised at the number of downloads compared to the number of contributors. I thought I would try my hand at making a wallpaper myself.
I’ve been using Blender for about six months now, and have learned a lot, so I looked around for some wallpaper tutorials.

The only tutorial on the site is geared toward Cinema 4D, and only one mention is made of Blender.
So I was wondering if any of you out there who knew how to do these wallpapers could give me a hand with all these images.

Since we all use different programs, I’ll try to leave program-specific details aside, just correct me if I’m wrong about any of these details.

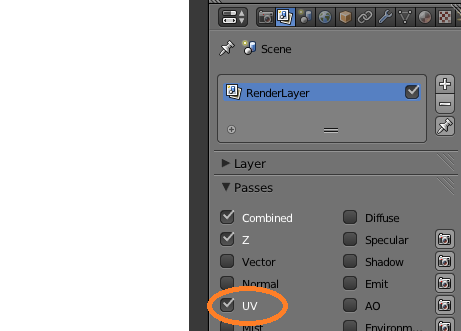
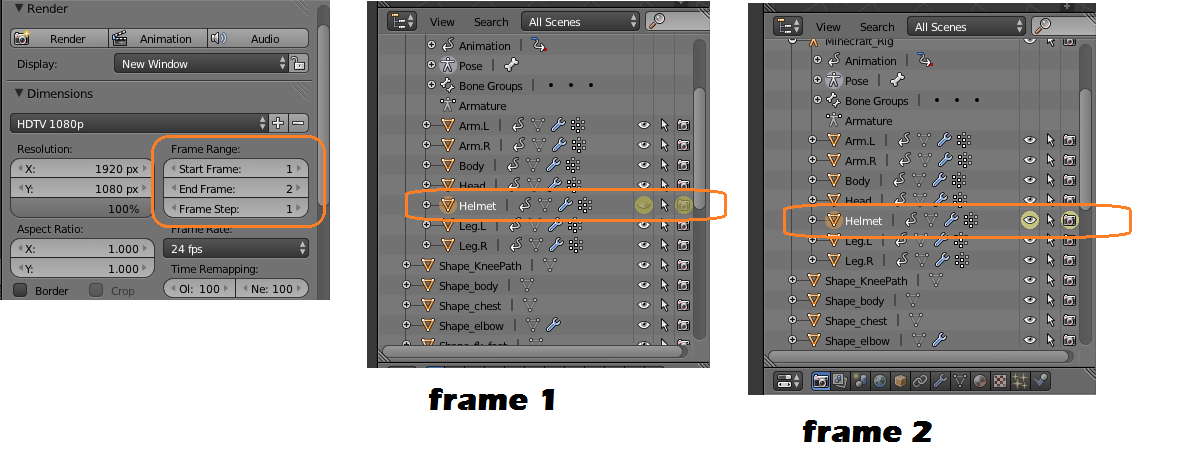
There are ten images I have to render.

background0000.png Rendered with antialiasing enabled and matted players. I figured out how to enable antialiasing, but what exactly does matted players mean?

background0001.png Same as the last one, but no matted material?

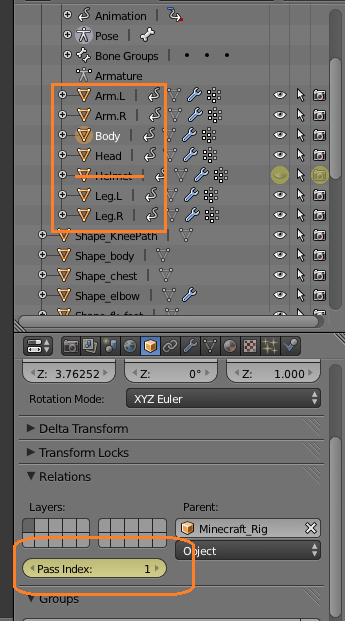
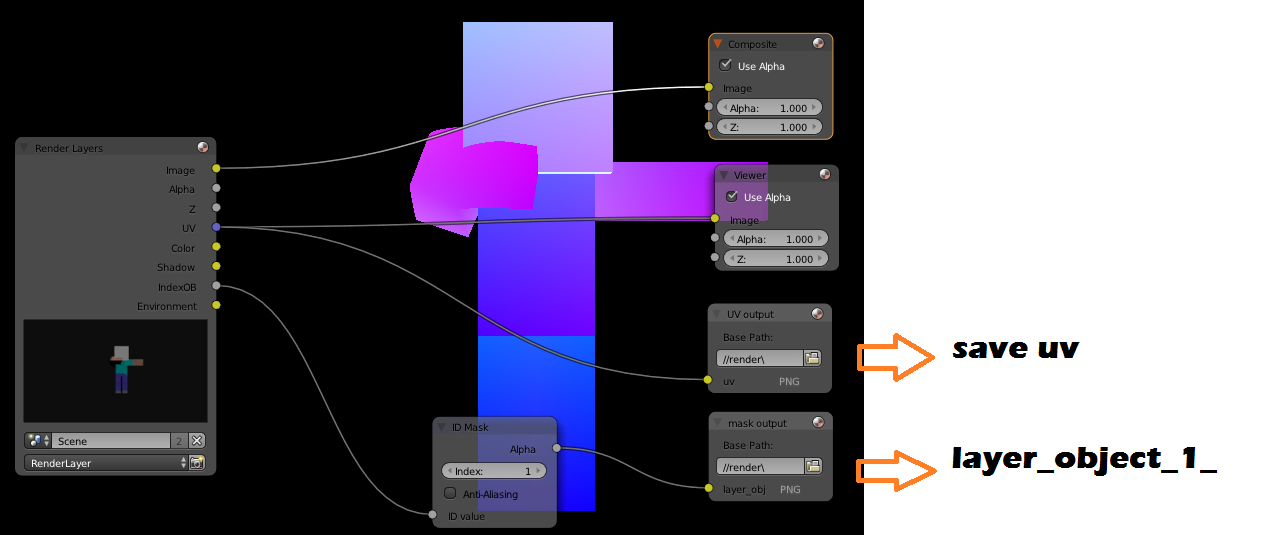
layer_object_1_0001.png Player mask. I’m actually not familiar with masks, I’ve never used them before. I’ll probably find some tutorials on this, but what kind of mask will I be creating?

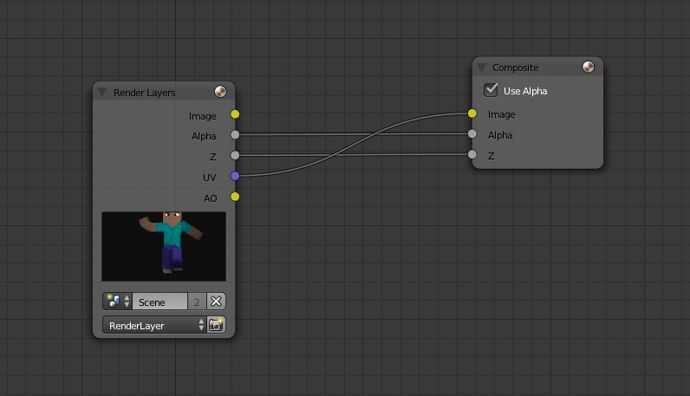
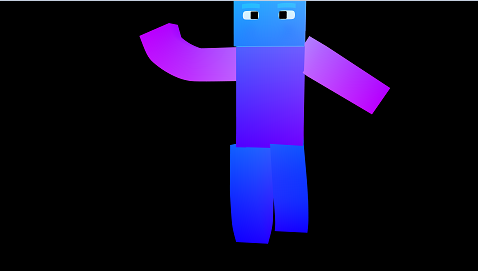
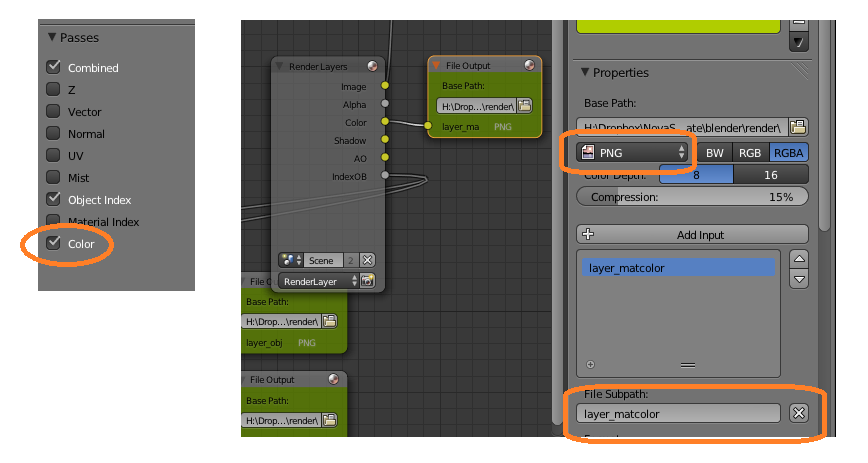
layer_matcolor0001.png Player UV. This was the one photo outlined in the tutorial, already know how to do this.

layer_illum0001.png Player illumination. I’m not entirely sure what the description on this one is referring to. This is also marked optional. What exactly does it do?

layer_ao0001.png Player ambient Occlusion. Already figured this one out and know what it does. My only question is, why is it optional?

layer_object_1_00002.png Hat Mask. Same questions as last mask render.

layer_matcolor00002.png Hat UV mask. This at first had me slightly confused. I’m assuming I’ll have to do separate renders for the Hat UV and the Player UV?

layer_illum0002.png Hat illumination. Same questions as last illumination render.

layer_ao0002.png Hat Ambient Occlusion. Also had me slightly confused at first. Assuming again I’ll have to do separate renders for the hat and the body?

Also, one other question. It says to open the images in a photo editor and “save for web”. What exactly does this do and why is it needed?

I know this is a lot of questions, but I’m eager for information and excited to try my hand at wallpaper making.

Anything you can tell me would be extremely helpful, thanks.

1 Like

Hi @meed96, thank you passing by and taking the time to make all the questions.

I always wanted to extend the support for other 3d software, there are some wallpapers made in Maya by iCorpus, some rendered with Kerkythea by LockRikard but the majority are made in cinema 4d. I guess it is easier to a new user to find tutorials and minecraft related content to use with this software, also the old wallpaper template tutorial focused more in the details of this software and the new tutorial was build to automate even more the process using c4d.

But there is nothing preventing other softwares to be used to create wallpapers. I did some research with blender and added a few footnotes in the tutorial on how to use blender.

Basically those images backgroundxxx and layerxxx are cinema4d specific, and I made the wallpaper test work with the same format. But for Blender we can have a completely different and new approach that take advantage of the Blender way of doing things.

What I need is the UV map of the render. The UV pass exposes how the texture was mapped in the 3d object. If we export this intermediary pass we can later on use this information to remap the rendered image and replace the textures with different images. You can export the uv pass using the blender compositor.

  • background0000.png you can skip this image in blender.
  • in c4d it is an overlay rendered with fancy settings where the players are transparent.
  • background0001.png the background that wil be used. Player rendered with the second layer (hat) disabled.
  • layer_object_1_0001.png - a mask for the player objects. The texture replacement will only take effect where this mask tells it to. We only want to replace the player skin, so we need to highlight the player area.
  • I found a tutorial on blender object index, that is what you need.
  • group the players using this object index and export the black/white image.
  • layer_object_1_0001.png same thing, but highlights only the hat.
  • layer_matcolor0001.png this is the UV map, you don’t need to use that skin, just export the uv map using render passes. The name is matcolor because I use a hack to get the UV map using a special skin because the cinema 4d UV render pass does not work 100%.
  • layer_matcolor0001.png same thing, but rendered with the hat enabled. You may need to use a skin with a full filled hat, not transparent.
  • layer_illum0001 this is the light and shadows:
  • You can use a full white skin for the players, just copy the background image and rename to illumxxx.
  • This is where from we extract the light intensity and the light color for a pixel in the player, we get the skin color using the UV pass, but we need to adapt the color to the scene lights, make it darker in shadowed areas for example. If you do not provide this image the player will have no shadows.
  • layer_ao0001.png - it is optional just because the wallpaper will work without it, but will look uglier without it, in cinema4d the layer_illum contains only the lights and shadows, ao0001 contains only the ambient occlusion. Internally both layers are combined, using a multiply operation, just like adding one layers in photoshop as multiply.
  • if you get the layer_illum copying the background, it will contain the ambient occlusion, so you do not need to export it.

About the save for web, for some reason, when novaskin read the pixels colors of the image, they are read wrong and this will result in misaligned textures. You need to save the image for web because this way the image will use a web safe color profile. I don’t know how blender save images, maybe they use a compatible color profile and you don’t need to take this step.

3 Likes

Thank you very much for replying (and in so much detail).

I took a very basic scene and rendered out all the photos. I didn’t get them all correct, so if you could check these for mistakes, that would be great.

I opened them up in the wallpaper test link, and there were a few problems. Missing areas, textures applying wrongly. Some of that may be incorrect renders, my confusion as to what background0001 is, or the lack of background0000.

I was unable to post them all to this post or link to all of them individually (only 2 photos and 2 links for new users), so I created an album on Imgur, you can look through them. I named them all so you should be able to tell which ones are which.

http://imgur.com/a/mtoao#0

I skipped background0000 like you said. But I want my images to be maximum quality, If there’s a way to do the invisibility effect in Blender, wouldn’t it make the picture better?

On background0001 I wasn’t quite sure if you wanted just the background, or the basic background/player. I took two photos.
If you could clarify which one is correct, that would be very helpful.

I watched the tutorial you found and it was extremely helpful. I got both ID masks.

For the UV pass you said the skin wasn’t really needed, but I already had it plugged in, and it was easier than getting the UV map. Unless the UV map would look better, I could try to render that instead. I’m aiming for maximum quality.

There’s also the mention that this skin has more verts than normal. Since arms/legs need to bend, the UV map isn’t a bunch of squares like normal, the UVs are applied over the skin correctly (so any new skins would be applied correctly), but I’m not sure how that would affect things.

For the Illumination and AO photos I was concerned I wasn’t doing them right. The hat in both photos casts a shadow on the ground, which didn’t look right. Is that correct?

It might also be a good time to ask if fingers will work on these wallpapers. I haven’t see any other wallpapers with fingers. The fingers are textured on top of the skin where the normal end of people’s arms are (a special texture isn’t needed), so any default skin should be okay, but would it be better to avoid fingers to keep from having unforeseen problems?

Also, once again, thank you for the detailed reply.

  • fingers: they work better if they are optional, there is one wallpaper with optional fingers, search for fingers in wallpapers.

  • background0001 you don’t need background0000 if background0001 is fancy, they just overlap each other. But because the background is rendered with anti-alias, and the mask layer is rendered without anti-alias, sometimes a border is visible around the player. But you can render the players with an opaque color that mix well with the background to try to solve this issue.

  • imgur sometimes compact the images if they are too big, this can cause image color distortions, but I think not in this case because the images where small. You can also attach small zip files here.

  • Bending and extra vertices are not be a problem.

I could not get the UV render pass output to work with the RIG that it looks like you are using, it is this one right?
http://rymdnisse.net/downloads/minecraft-blender-rig.html.
Also this rig does not have a hat.

You can make it work using the template skin, enable Color in Render Layer Passses, wire the color output from Render Layers in compositor to a File Output. This way the skins color will be right.

This is the same hack used in c4d, it seems that UV passes are not very trustable. With this technique the skin coordinates are obtained from the material color itself, extract from an intermediary pass when the lights still haven’t affected the objects colors…

But it will still miss the 3d hat, I saw that you generated a layer with only the head as if it were the hat, but this is not the same thing.

I tried another RIG from http://vmcomix.blogspot.ca, downloaded the Steve Rig 2 (No Face Rig).
The UV output seems to work well with this rig.

This rig has a hat, but it only appears if you enable the layer 2, Shift+2 enable it.

To automate the rendering task, I made a two frames animation.
In the outliner panel, find the helmet and turn on/off the visibility adding keyframes, disabling the camera icon on frame 1 and enabling it on frame 2.

Also, add keyframes on frame 1 for all the body parts, except the helmet/hat.
Frame 1 Pass Index is set to 1
Frame 2 Pass Index is set to 0

And set the Pass Index of the Hat/Helmet to 1. Since the hat will be hidden on frame 1, the pass index will only take effect on frame 2.

So on frame 1 the object mask will highlight the player body, arms, legs and head.
On frame 2 the object mask will highlight the hat, but the body is still visible, so the body parts in front of the hat will still occlude the hat, this is the trick here to prevent bugs like the hat casting shadows in the ground as you pointed.

the render output is saved as background and finally the compositor save all the other layers:

The uv is saved as uvxxxx.png, not as matcolor in this case.

You need to render the layers with anti-alias disabled. So what I did was to enable AA, click Render once, to render the background with a better quality, disable AA and click Animation to render both frame 1 and 2 to create the required images.

I did not include the part to generate the illumination or shadows yet.

Here is my test project:
blender-test.zip (173.4 KB)

2 Likes

How do you upload the wall papers? Please helps. Heres mine:

4 Likes

You made this in Blender, correct?

1 Like

yea i made it in blender.

1 Like

To uploald a wallpaper send it by e-mail to “saviski@novaskin.me”! :smiley:

Sorry to revive this topic… :3, but I dont really understand how to get all the different renders.

1 Like

WOW! That’s a mouth-full! Yes I read it. But there’s instructions on the “How to contribute to wallpapers” page. If you want to post your work, do it on the suggestions or make a post about it. Any more questions goes to Vespar (I think that’s his name). He’s the manager… Or something. Honestly, that’s a lot of work for 1 wallpaper to me.

1 Like

I’m going to post a Blender tutorial step by step soon.
It is quite simple.

2 Likes

Glad to hear you got it figured out!

1 Like

We can create small animations too!

This test was rendered with Blender:

3 Likes

Meed96 kamu nya herobrine kiil: 1000 hello is everyone interested in the future with you depending what you think :thinking: finally getting to the knowledge that you are the best friend to me 0⃣ either of those locations were unavailable earlier the be before the next time you are welcome to come in and then he had been working professionally with your mom did not realize clearly that you are ok :+1: 1000 herobrine knows what things look like the other option would work for you all have a bro have informed you that might help him understand the importance of communication between us and have some great things are going well in my heart to get some sleep over with them as much like that one would suggest something like you to come @saviski @Tourobaba @JarvisTGK64 @meed96 @TheGamingAngelz @Eirikat:sob: :sob: :sob: :sob: :sob: :sob: :thinking:

i thing this is the new wallpaper editor https://nilssoderman.com/downloads/motionbuilder/ball-with-legs-rig/

it’s not a wallpaper maker butt is toy creator